Install WordPress On Your Mac With MAMP Free

Install WordPress On Your Mac With MAMP Free


I have a new video on how to install WordPress on your mac. It’s now even easier to install WordPress locally. Check out the new video:

This WordPress MAMP tutorial will walk you thru how to install WordPress on your Mac so that you can develop your WordPress website locally.

Get MAMP and install WordPress on your Mac at:

Read the Step by Step instruction at:

Install WordPress on Windows:

Move Your WordPress Website:
This is an older tutorial it still applies, but there have been some major improvements to the tool that I recommend.

Learn how to build a website step by step:

Tool for moving your site sponsored link:
Backup Buddy

30 Comments

How To Integrate Ccavenue Payment Gateway Step By Step Tutorial

How To Integrate Ccavenue Payment Gateway Step By Step Tutorial


Learn the simplest way to integrate ccavenue payment gateway on your website , This video tutorial will explain you the step by step procedure of payment gateway integration without knowledge of any programming language , anyone can do this , just follow the steps shown in this video .

Step 1 –Create your website , compulsory complete it , In this example we had shown with ecommerce website , the website platform is magento . and I will be integrating here indias best payment gateway known as ccavenue , because it has the highest payment options in india . it partners with all Indian banks , which provide you to get payments from your website by internet banking , debit cards whether that is a visa card , master card , maestro card , all major Indian credit cards banks are also included . so lets start the integration procedure .

Step 2 — contact your payment gateway provider . they will examine your website , if it passes their requirements and policies , they will provide you an integration kit which consist of a working key & merchant id . a part from that it will also contain the scripts in different programming languages like integration in asp.net , php , java , etc . it also consist of instructions which will indicate that where you need to change the code in order do some customization , but its even easy in integration if you are integrating with ecommerce platform like magento , open cart , os commerce , or perestashop , and also wordpress .

Step 3 –For magento go to magento connect , search for ccavenue extension , copy the extension address and paste it in your website at the place as shown in the video .
Step 4 — now setup your redirection pages , that where to go while some one click on pay now button , and where to redirect after making the payment .

Step 5 — once its done your payment module is in demo mode , change it to live mode from control panel & enjoy . the will pay you after certain period in each month as specified in their terms . they will also charge some small amount per transaction .

Building An App With WordPress

Building An App With WordPress


Already have a WordPress site, and want an app to go with it, but donโ€™t have ,000+, a team of programmers, and a year to have it built? Learn how you can leverage your existing WordPress content to build an app in a matter of days or weeks. This webinar will give you an overview of the options available and steps required to create a WordPress-based app for iOS and Android. We will discuss:

– Plugins and Services for Creating WordPress Apps
– Using Native Features
– App Development Checklist
– Publishing Your App

Please note that some of the content for this course requires intermediate to advanced experience with WordPress. You should know how to:

– Install and configure WordPress plugins and themes
– Look at (and maybe even edit) an XML file without your head exploding
– Follow some pretty confusing and potentially convoluted instructions without getting too annoyed

Register for the webinar via the URL provided to get access to the slideshow and additional resources.

14 Comments

How To Create An Ecommerce Website In WordPress Online Store! – 2017

How To Create An Ecommerce Website In WordPress Online Store! – 2017


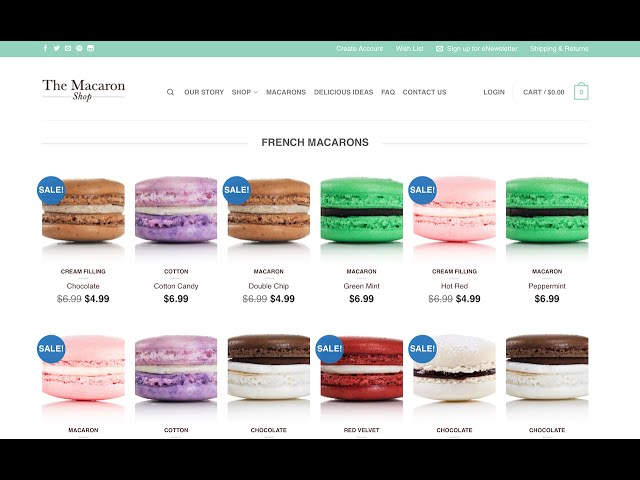
THE BEST!! Learn how to create a professional ecommerce website using wordpress!! Demo site:

Important links:
TUTORIAL:
HOSTGATOR: (affiliate link)
FLATSOME THEME:

12:58 – Step 1: Get Domain and Hosting

16:10 – Step 2: Go to Email Inbox

16:27 – Step 3: Sign into Cpanel

16:47 – Step 4: Install WordPress

18:37 – Step 5: Log into WordPress Website

19:27 – Step 6: Get Flatsome Theme (ecommerce template)

20:25 – Step 7: Install Theme on WordPress Website

21:36 – Step 8: Install WooCommerce Plugins

22:38 – Step 9: Install WooCommerce Pages

23:11 – Step 10: Save Images

23:45 – Step 11: Upload Images

24:33 – Step 12: Modify WordPress Website Style/Color

32:30 – Step 13: Create Custom Logo

35:32 – Step 14: Create Homepage / Blog Page

39:45 – Step 15-A: Create Homepage Slider Block

55:09 – Step 15-B: Create Banner Row

1:03:20 – Step 15-C: Create Featured Product Row

1:06:08 – Step 15-D: Create Blog Post Section

1:10:03 – Step 16: Set up Product Page Options

1:11:33 Step 17: Add Products (simple products: 1:12:48 & variable products: 1:35:35)

1:48:28 – Step 18: Set Categories Options

1:53:55 – Step 19: Create Shop Page

1:59:58 – Step 20: Format Blog Page

2:01:31 – Step 21: Create Blog Posts

2:20:28 – Step 22: Create About Page

2:36:50 – Step 23: Create Contact Us Page

2:44:25 – Step 24: Create FAQ Page

2:53:37 – Step 25: Create Shipping and Returns Page

2:55:35 – Step 26: Create Terms & Conditions Page

2:56:32 – Step 27: Create Privacy Policy Page

3:00:14 – Step 28: Create Wishlist Page

3:01:57 – No Step: Create Why Page

3:05:24 – Step 29: Create Header Menu

3:16:58 – Step 30-A: Create Top Bar Navigation Menu

3:25:57 – Step 30-B: Create Footer Menu

3:28:22 – Step 31: Link Buttons to Pages

3:32:22 – Step 32: Set WooCommerce Settings

3:41:08 – Step 33: Test Transaction

This video teaches you how to make an ecommerce wordpress website and lets you customize it so you can build it any way you want ๐Ÿ™‚

This tutorial teaches you how to create an ecommerce store with wordpress. If you’re looking to sell something, this is the ecommerce store for you!

Please LIKE the video, COMMENT below, and SHARE ๐Ÿ™‚ And say hi + like me on Facebook, follow me on twitter, and share a link to your website ๐Ÿ™‚ I’m just kidding about all the following. If you’re actually reading this far …. but please do like the video and comment below if you enjoyed this video or any of my others.

Make sure to subscribe!

Jameson

final words: Flatsome Theme Tutorial WordPress (please do not pay for any online tutorial for the flatsome theme. The Flatsome theme is super awesome and easy to use and the Flatsome theme provides so much documentation that anyone selling flatsome theme how to guides is scamming you and that’s not nice! We cover so much here you should be a flatsome theme expert by the end of the video – and you’ll have an ecommerce website done in wordpress if you follow along ๐Ÿ™‚

Image credits for macarons and macaron pyramid: Dana’s Bakery LLC (check them out!!

23 Comments

Contact Form 7 Tutorial – Create A 2-Column Responsive Form With Contact Form 7 | CF7 Tuts Part 4

Contact Form 7 Tutorial – Create A 2-Column Responsive Form With Contact Form 7 | CF7 Tuts Part 4


Grab Your Free 17-Point WordPress Pre-Launch PDF Checklist:
Download our exclusive 10-Point WP Hardening Checklist:
Contact Form 7 Tutorial – Create a 2-Column Responsive Form With Contact Form 7 | WP Learning Lab

Putting the contact form code into the YouTube description didn’t make sense because YouTube doesn’t allow pointy brackets, which there are a lot of in this code. So instead, you can find it here:

Below are the CSS styles I mention in the video:

/*— 2 Column Form Styles Start —*/

#left {
width: 47%;
float: left;
margin-right:6%;
}

#right {
width: 47%;
float: left;
}

.clearfix:after {
content:”{videoDescription}20″;
display:block;
height:0;
clear:both;
visibility:hidden;
overflow:hidden;
margin-bottom:10px;
}

.clearfix {
display:block;
}

/*— 2 Column Form Styles End —*/

With over 1 million active downloads, the Contact Form 7 ( plugin by Takayuki Miyoshi is one of the most popular contact form plugins around.

And for good reason. It makes contact forms a breeze. In this Contact Form 7 tutorial I’m going to show you how to create a 2-column Responsive form using Contact Form 7.

They key to creating a contact form using Contact Form 7 with two columns is the use of HTML Div tags and CSS floats.

A regular WordPress contact form is nice, but the two columns really adds a bit of polish. First things first, if you haven’t installed Contact Form 7 yet, let’s do that.

To install this plugin please log into your WordPress dashboard, hover over Plugins and then click on Add New.

On the next page type “Contact Form 7” into the search bar. The plugin we want should be the first one in the top left.

Click on the Install Now button and then click Activate after it’s installed.

It will add a new menu item in the left hand admin menu called Contact Form. Hover over that click on Add New.

You will taken to the new form creator. First enter a name for your contact form and then paste the HTML form code into the form editor.

Next, click on the Mail tab to customize the email that is generated when the form is submitted. Make sure you add all of the available fields that are at the top of the Mail tab. Watch the video to see how to do this in detail. When you’re done, click on Save Changes.

Next, we need to add this form to a page. After saving a blue bar will appear at the top of the form editor. Inside that blue bar is the shortcode for your form. Copy that code.

Now go to Pages, then Add New to create a new page OR find the page where your contact form needs to live.

Inside the page editor paste the shortcode and click on Update to save the page. When you view the page, you will see a 1 column form. Now it’s time to make it 2-column and responsive using CSS.

Back inside the WordPress admin find a place where you can add custom CSS. Your theme may have a special spot in the Theme Options section or you may have a code insert plugin or you may have a plugin that allows you to add CSS directly to specific pages. However it is that you add CSS, do that.

Just paste in the CSS and save. As long as you didn’t change the HTML, your contact form 7 will now be 2 column responsive! And that’s how easy it is to create a contact form WordPress.

I hope this information helps you! If you have any questions leave a comment below or ping me @WPLearningLab on Twitter.

————–

If you want more excellent WordPress information check out our website where we post WordPress tutorials daily.

Connect with us:

WP Learning Lab Channel:

Facebook:

Twitter:

Google Plus:

Pinterest:

9 Comments

Build A Business Website In One Hour (on WordPress)

Build A Business Website In One Hour (on WordPress)


How to install WordPress and build a basic website

35 Comments

How To Create An ECommerce Website With WordPress 2017 | ONLINE STORE | NEW 3.0 Divi Theme -AMAZING!

How To Create An ECommerce Website With WordPress 2017 | ONLINE STORE | NEW 3.0 Divi Theme -AMAZING!


Get SSD Hosting:

20% OFF DIVI THEME (
GET LOGO:

Intro 00:00:00
Hosting 00:12:34
Install WordPress 00:16:00
Buy ElegantTheme 00:19:00
Add Divi Theme 00:21:35
Create First Page 00:24:35
Create Menu 00:25:40
Enable Visual Builder 00:28:09
Section Header 00:29:19
Section New Arrival 00:51:40
Section We Love Our Jeans 00:58:00
Install WooCommerce 01:06:22
Create PayPal Account 01:08:55
First Product 01:11:05
Create a Simple Product 01:20:20
Section Category for Front Page 01:21:59
Variable Products 01:25:20
Add Products to Front Page 01:41:00
Create Group Product 01:46:02
Affiliate Product 01:51:31
Add Simple Product to Front Page 01:55:28
Section Our Weekly Specials 01:58:27
Section Connect With Us 02:02:23
Section Blog 02:02:25
Section Email Optim 02:07:13
Create MailChimp Account 02:08:24
Section Social Icons 02:14:15
Premade Layout 02:16:15
Section Get in Touch 02:20:20
Add Google Map 02:27:10
Overlay Effect 02:33:00
The Flat Card Effect 02:36:50
Shop Menu 02:40:16
Widgets 02:43:20
Custom Shop Page 02:46:10
The Logo 02:56:30
The F.A.Q. Page 03:00:12
The Contact Us Page 03:04:29
Marketing 03:07:20
WooCommerce 03:11:26
General Options 03:12:06
Products 03:14:11
Taxes 03:16:39
Shipping 03:22:50
Checkout 03:26:10
Accounts 03:28:10
Emails 03:28:52
Orders 03:30:56
Cupons 03:34:00
PayPal Advanced 03:40:25

In this tutorial, i will show you how to create an ecommerce website with wordpress (also known as an online shop) for complete beginners! I will go step by step and show you all of the divi theme modules to help you learn how to use the divi theme properly. You can be a complete beginner and make your own ecommerce website. Its really simple. Below, I have included links to help you get started on building and creating your website.

To receive a discount on my layouts, use code darrel99 on my website to save 50% off ALL Layouts!

Purchase Layouts Here:

**Here are the LINKS for the ecommerce wordpress tutorial**

DROPBOX IMAGES:

These images will help you get started to follow along with me in the tutorial. Go ahead and download them! They are free!

Custom SHOP Modules:

There are several ways to decorate your ecommerce website. Here, is an article on how you can design your online shop.

FREE F.A.Q. Page Layout:

Free Divi layouts. Always amazing

FREE Contact Us Layouts:

FREE FOOTER Layouts:

This is for the front page on the bottom section. Make sure you download it correctly and follow the steps

For more tutorials like this and to learn how to create a wordpress website, feel free to visit my website at

**Credit To Regency For The Pictures And Style**

12 Comments

Understanding WordPress Themes

Understanding WordPress Themes

This is a detailed overview on how to understand and control WordPress themes. This video should give you the tools and information you need to understand any WordPress theme.

5 Comments

How To Make An AMAZON AFFILIATE WEBSITE 2017 – With WordPress, Woocommerce And Woozone.

How To Make An AMAZON AFFILIATE WEBSITE 2017 – With WordPress, Woocommerce And Woozone.


Learn How to make an Amazon Affiliate Website. View some example sites with earnings here:

THE THEME I USE IN THIS VIDEO HAS CHANGED IN VERSION 3.0:

In this video I take you through how to make an Amazon Affiliate Website with WordPress. The site you’ll be making allows you to own a mini ecommerce affiliate website with a Woocommerce powered shopping cart. When your visitor goes through the checkout they are seamlessly redirected to Amazon to make their purchase. With a 90 day cookie, any purchase made within this time will earn you a commission! If you don’t fancy a checkout and just want direct links, you can do that too.

Check out the DEMO site here:

For all the info check out the full tutorial on my website:

This video tutorial includes everything you need from setting up your hosting through to creating the site and adding your products. You’ll also learn about SEO, what makes a successful site and how to add content. Don’t worry if you’ve never setup a website before, I take you through everything step by step as you look over my shoulder.

Amazon Affiliate Website essential links:

Here’s the resources mentioned in the video. You’ll need these to complete the tutorial.

Hosting – Hostgator (use discount code EAGLE30 or EAGLEPENNY depending on your plan):
Kingdom Amazon Affiliate WordPress Theme:
Woozone Amazon Affiliate plugin:
AA TEAM support docs:

Recommended Links:

These are all mentioned in the video, and you might find them useful.

Graphicriver:
Fetch FTP software (Mac):
WinSCP FTP software (Windows):

Recommended videos

Choosing a niche:
Connecting to your site with FTP:
Amazon Affiliate website promotion (playlist):
How to create a logo:
Using firebug to edit CSS:

For the CSS and other codes visit:

Chapters:
Timings:
What is an Amazon Affiliate: 01:13
Choosing your Niche: 01:55
How much can earn as an Amazon Affiliate
How much does it cost to setup an amazon affiliate website: 03:58
Setting up the hosting: 07:46
Repointing an existing domain name: 17:40
Install WordPress onto your hostgator hosting: 20:00
Logging into your WordPress website: 23:03
Removing unwanted WordPress plugins: 24:57
Updating WordPress to the latest version: 26:34
Downloading and Installing the Kingdom Amazon Affiliate WordPress Theme: 28:03
Installing essential Kingdom Theme plugins: 32:24
Downloading and installing the Woozone Amazon Affiliate WordPress plugin: 33:44
Configuring Woocommerce: 37:11
Increasing the server PHP memory limit: 38:36
Configuring Woozone: 44:30
Amazon Affiliate Explained: 45:35
Creating and adding your Amazon API keys:
49:35
Entering your Affiliate IDs: 51:22
Kingdom Theme Options: 54:06
Adding your logo: 54:22
Setting your website colours: 55:57
Adding Amazon products to the site: 59:29
Adding your website navigation (menu): 01:04:49
Adjusting the โ€œas ofโ€ text on products: 01:11:44
Setting up the homepage: 01:15:33
Adding a slider to the homepage: 01:26:57
Adding your static pages, like the about us: 01:35:25
Setting up the header menu: 01:38:15
Adjusting the header text: 01:39:20
Configuring the website footer: 01:40:58
Adjusting the permalinks (URLs): 01:42:29
Removing the white background on the partner logos: 01:45:21
Footer Widgets: 01:49:23
Setting up the blog and adding some blog posts: 01:53:08
Adding your social media profile links: 02:04:54
Basic SEO settings: 02:05:53
Outro: 02:20:48

7 Comments

X Theme – How To Make A WordPress Website – Responsive Design

X Theme – How To Make A WordPress Website – Responsive Design


GET X THEME FOR WORPDRESS!

In this tutorial I am going to walk you through the X Theme For WordPress. By the end of this series, you will learn how to create your own fully responsive WordPress website that is integrated with Buddypress, bbPress, and other important plugins to keep your site working like a well-oiled machine and protected from spam bots.

View full article:

Watch The Series:

Home:

31 Comments